Web UI Responder Guide
Prerequisites
For this guide, we assume:
- Your basic integrations (Jira, Zoom, Slack, etc.) have already been set up by an admin
- You have a user account on FireHydrant within your Organization*
If the above is not met, we recommend reaching out to your FireHydrant Owners to invite you to the organization and to set up the integrations required. Reading the introduction will give you an idea of the FireHydrant platform's many moving parts.
*Note
If your organization exists on FireHydrant already, do not register for an account directly on FireHydrant's website - this will create a new, separate organization. Instead, ask an admin from your org to invite you/provision an SSO seat for the existing organization.
Basic FireHydrant concepts
- Incident: Any declared situation. Can range in severity from
UNSET(unknown severity) toSEV1or whatever you customize. Each incident has its own home page and timeline. - Milestone: The current status of an incident. As you mitigate, you will want to keep this up-to-date, and FireHydrant will automatically log the timestamps of these transitions to generate our Analytics.
- Runbook: FireHydrant's automation engine. Traditionally, "runbooks" describe sets of instructions and steps for responders to execute, but on FireHydrant, these steps will execute automatically.
- Service Catalog: FireHydrant's catalog for your system's components. It helps tie together teams, users, and the components they own, making it easy to pull in the right people for the right things.
- Retrospective: A review of an incident. FireHydrant's Retrospectives contextualize and gather all incident information for you to make your reviews focused and productive.
For a deeper view of all parts of FireHydrant and the incident lifecycle, visit the Incidents section of the documentation on the left.
Responding to Incidents
With the above concepts covered, let's dive into conducting incidents.
FireHydrant supports driving incidents end-to-end from both Slack and the user interface. This guide covers handling incidents via UI. Visit the Slack Responder Guide here.
Starting incidents
Anyone with a FireHydrant account can login and declare an incident in the FireHydrant web UI by clicking the Declare Incident button, always present in the top navigation bar.
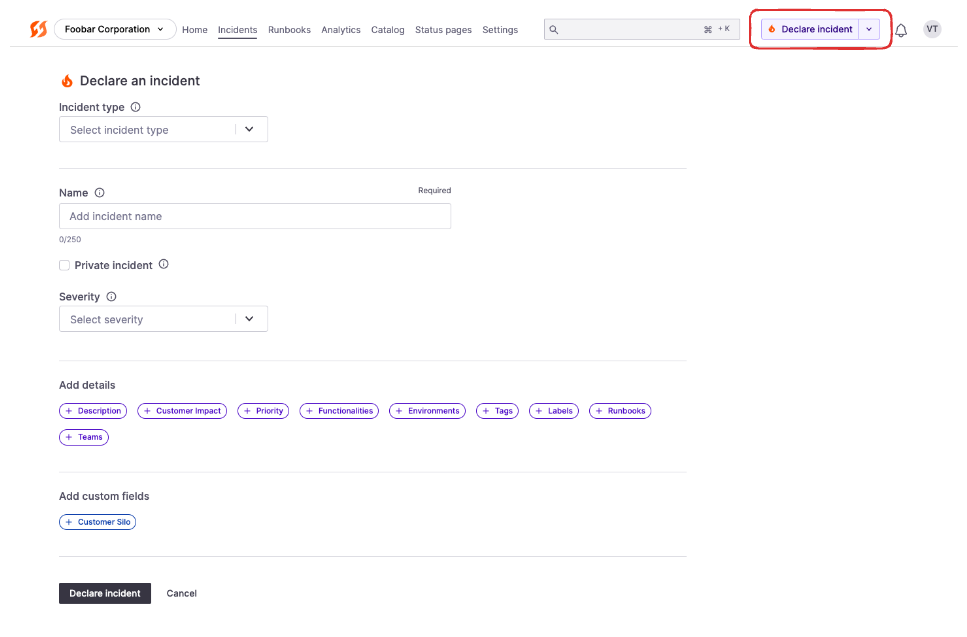
Declare Incident form in the web application
Additional Resources
Assigning roles and teams
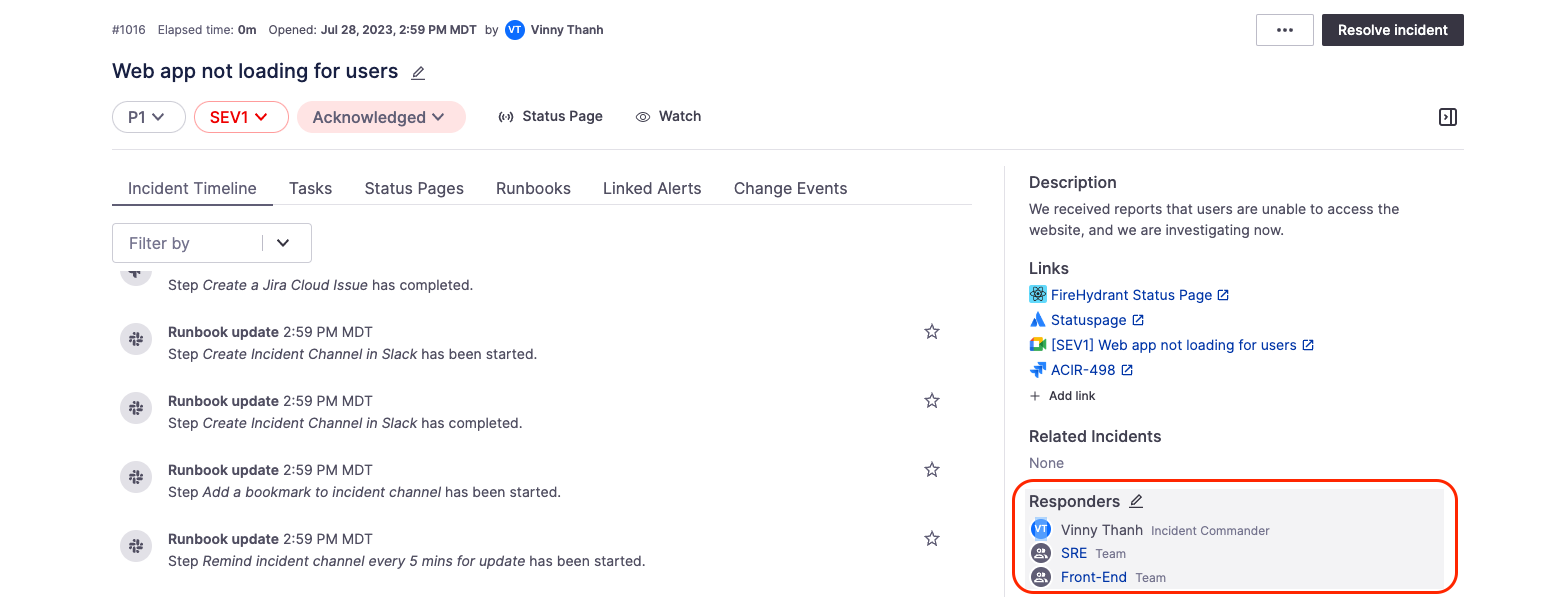
Assigning responders from Command Center
From the Command Center, click on the Responders section in the Details panel. This opens a modal where you can select individuals or teams to assign to the incident.
Additional resources
Managing tasks

via Command Center Tasks tab
In the Command Center for an incident, you can visit the Tasks tab to create and manage incident tasks.
Additional resources
Editing incident details
On FireHydrant, we distinguish between editing vs. updating an incident. An Edit is a modification to incident details, such as the severity, name, description, or any other fields.
To edit incident details, hover over any of the sections on the right side Details and click the edit pencil icon or any of the dropdowns near the top for Priority, Severity, and Milestone.
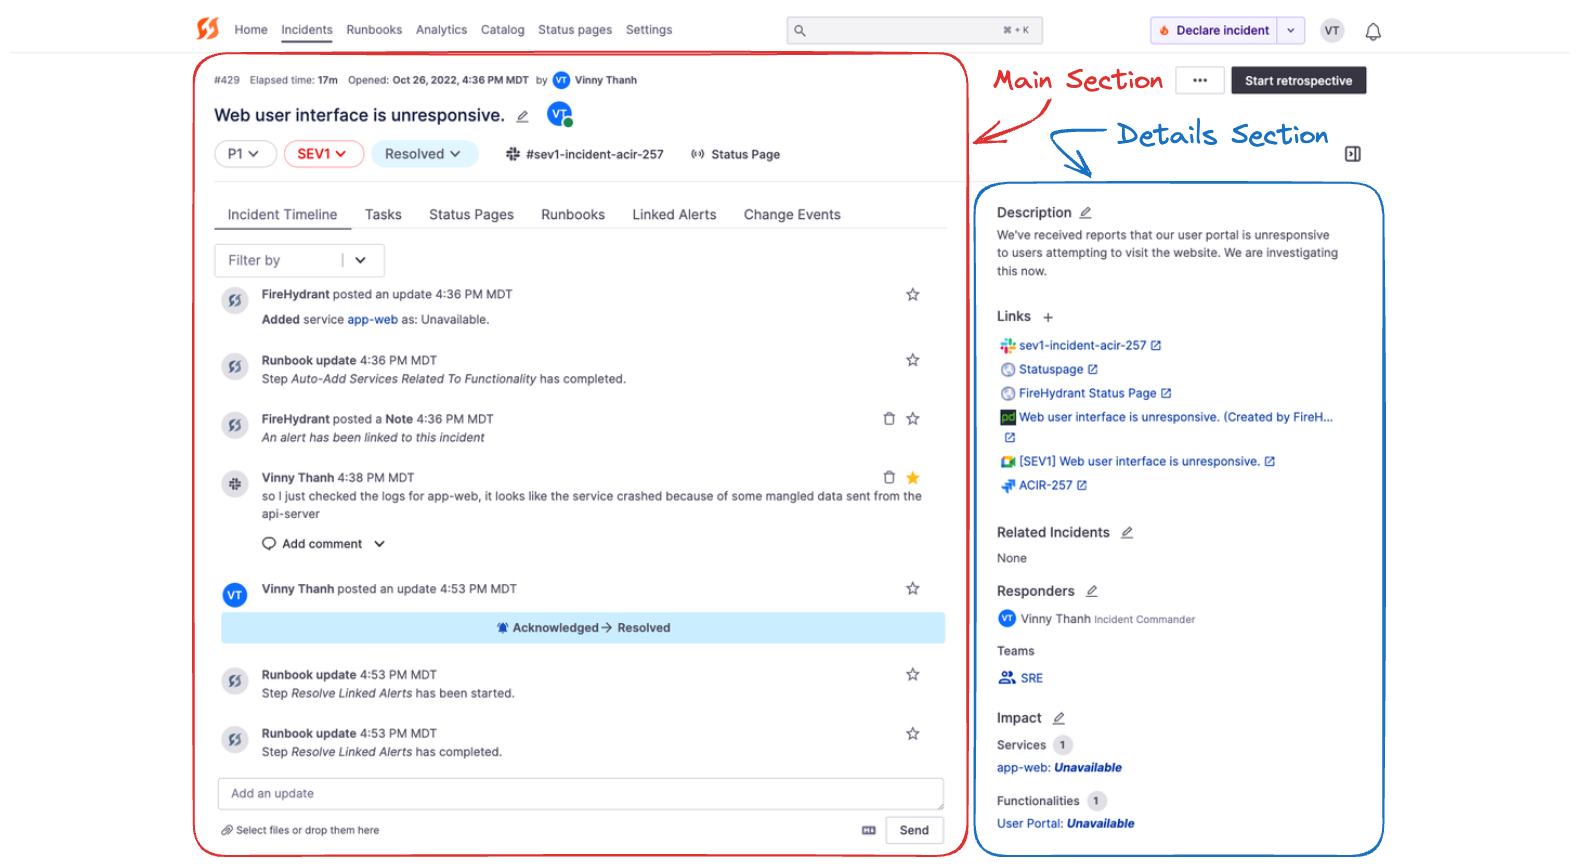
Parts of the Command Center interface
Additional Resources
Posting an update
An Update is a more formal notice or message from a responder on the overall progress of an incident.
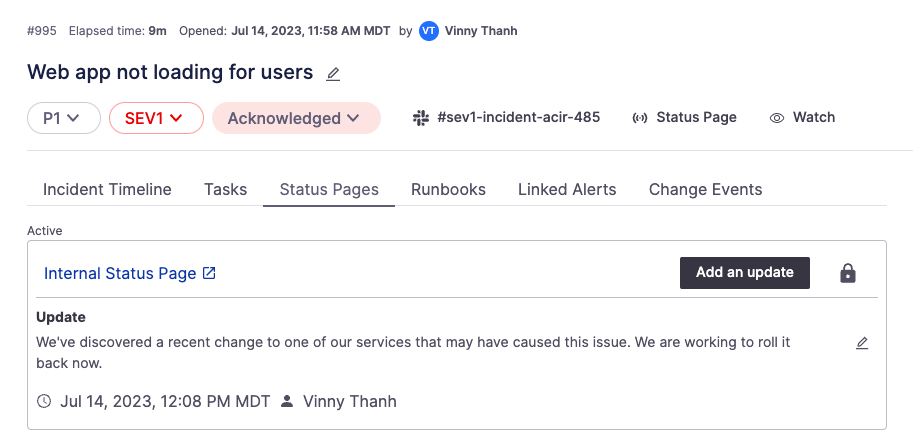
The Status Page tab in the Command Center
To post an update, click on the Status Pages tab and then click "Add an update" next to any status page you want to post an update to.
Additional Resources
Marking or Starring important messages
You can flag specific messages or timeline events as important. We call these "Starred events," and they are shown first in the Retrospective and exported as part of the timeline to PDF, Google Docs, and Confluence.
In the user interface, you can click the star next to any timeline item to flag it.

Starred events in the Command Center
Additional Resources
Viewing service info & paging
One of the key components of FireHydrant is the Service Catalog, which helps you align your teams and team members with the areas of your product they own.
In the Web UI, you can view Service Catalog information by clicking Catalog on the top navigation bar. We currently do not support paging from an incident's Command Center today, but you can configure automatic alerting when a service is added to an incident.
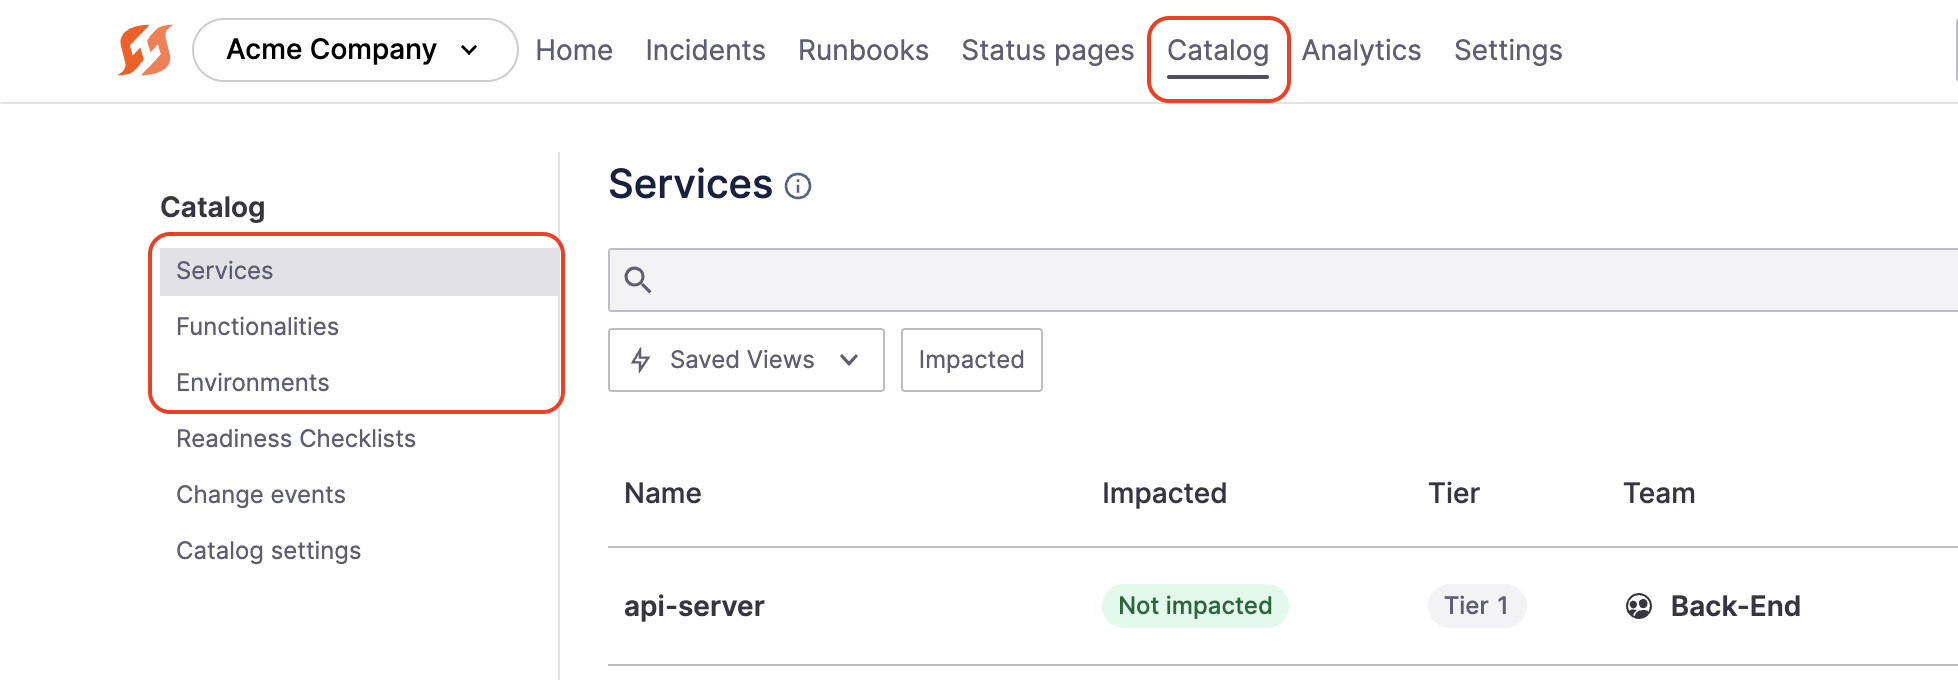
Viewing the Service Catalog from the UI
Additional Resources
Create follow-ups
While Tasks are ephemeral items to handle during an incident, Follow-Ups are action items that should be prioritized for work later. When creating Follow-Ups, you have the additional capability to select an external ticketing project, and this will create a corresponding ticket in a 3rd-party tool (like Jira).
In the Command Center, Follow-Ups are managed on the same tab as Tasks and shown just below Tasks.
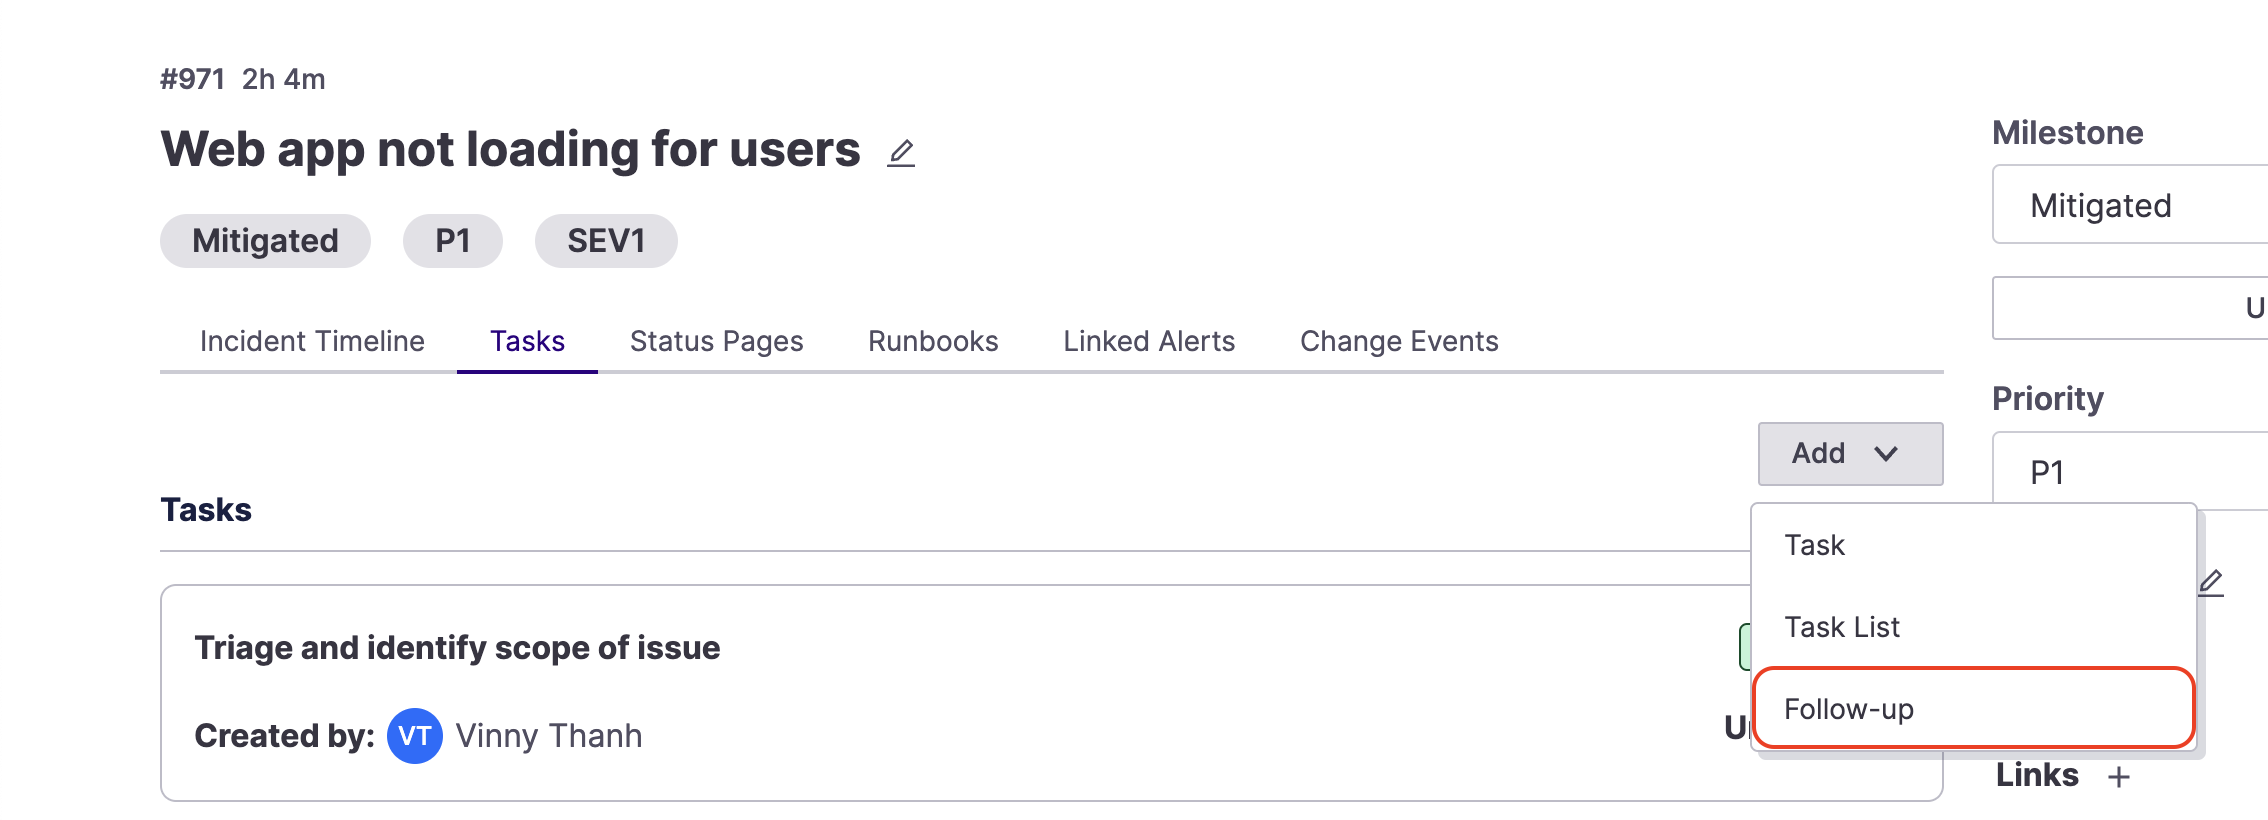
Command Center Tasks/Follow-ups tab
Additional Resources
Resolving the incident
Typically, users will first transition an incident to the Mitigated Milestone and observe the situation for a while to ensure things are stable. Once engineers have confirmed or feel confident things are fully resolved, they may close the incident on FireHydrant.
Note:
Resolving an incident will halt all current repeating Runbook steps, resolve the incident on any attached status pages, and update all Slack notify messages to reflect the new state.
In the Command Center, every incident will have a button to Resolve at the top right. You can also click the Milestone dropdown and select Resolved.
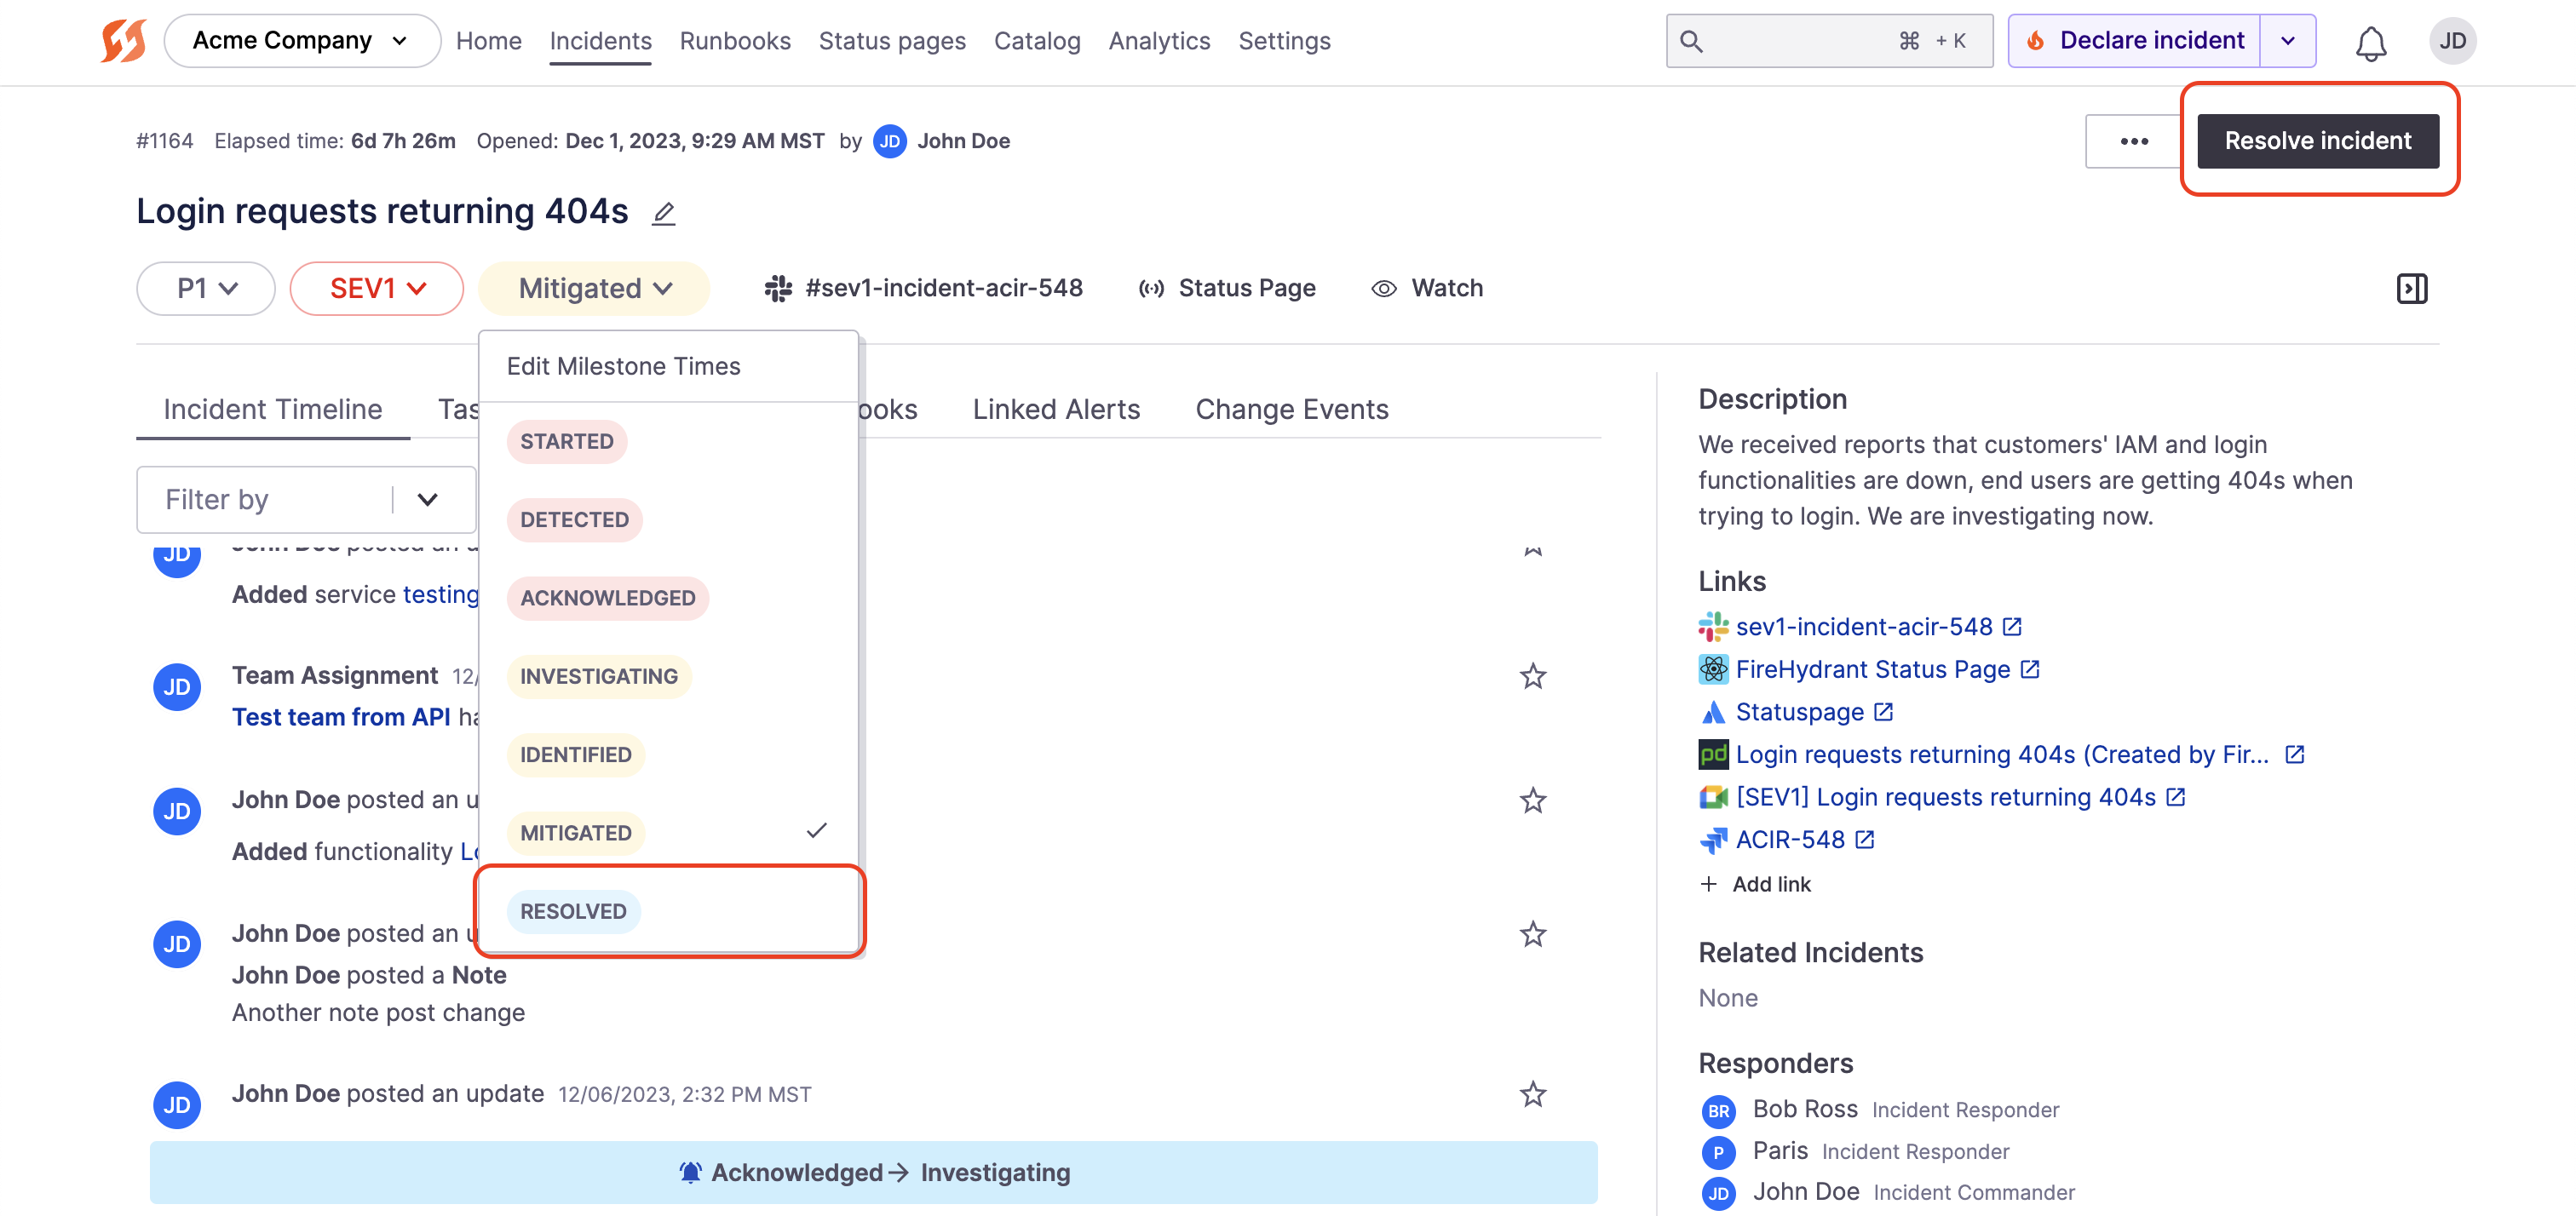
Resolve button and milestone dropdown in the Command Center
Additional Resources
Running a retrospective
A retrospective is your team's opportunity to learn from the incident.
Starting the retro
In the Incident Command Center, once the incident is resolved, the button at the top right turns into Start retrospective.
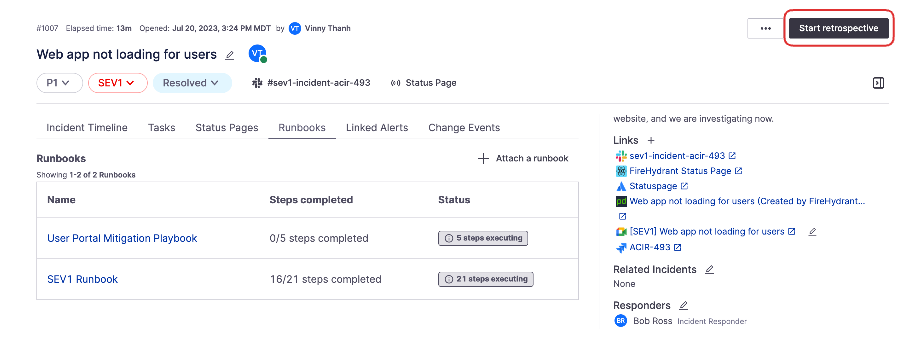
Starting the retrospective from the Command Center
Conducting the retro

Incident Retrospective
The Retrospective, like the Command Center, has two sections: the main section and the timeline. The timeline is to the right and shows Starred Events by default. You can adjust the filters to show other events.
The main section contains the core content of the retrospective, separated into multiple tabs. You can work your way through all of the details and tabs one by one.
- Incident Overview - Provides a summary of key information like milestones, description, customer impact, impacted components, responders, and more.
- Contributing Factors - These are the items that are seen as having led to the incident, or the "causes". Many of our customers do their "5 Whys" analysis here and also note down any other factors that could have contributed to starting this incident.
- Lessons Learned - These are the review questions. FireHydrant ships with default questions, but these can be customized according to your organization's needs.
- Tasks - This is the same Tasks tab shown in the Command Center. Here, you can review all of the open/closed Tasks as well as Follow-Ups.
- Change Events - FireHydrant can ingest change events in your repositories or infrastructure and automatically associate them to incidents based on which components were impacted. You can then mark them as the cause of an incident or dismiss them.
Once you've filled out the Retrospective, click Publish at the top right, which will transition the incident to the final milestone: Retrospective Completed. This will also generate a PDF report of the retrospective, and if your organization has these Runbook steps configured, will also export the report to Google Docs and Confluence.
Additional Resources
Reviewing Analytics
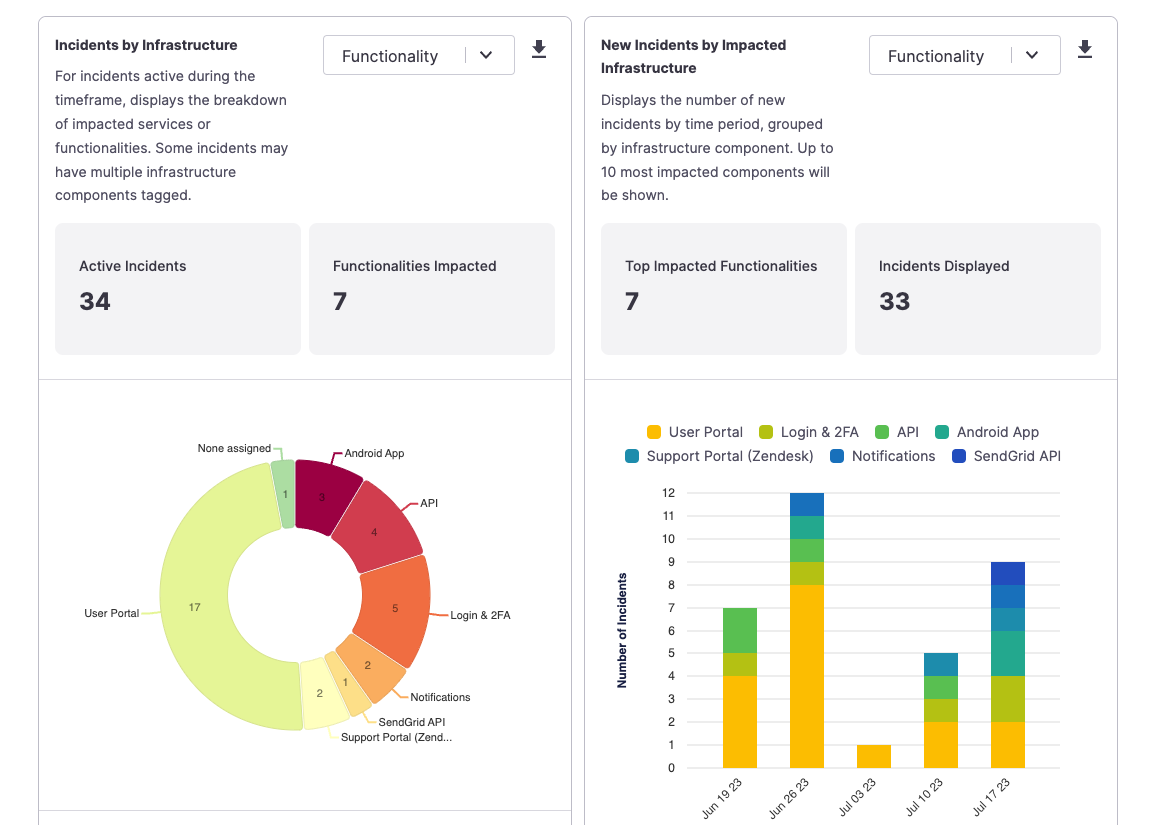
Example Analytics graphs
Once you've completed the retrospective, head over to the analytics section of the FireHydrant UI to see what types of metrics we track. All of the graphs can be exported to CSV or PNG formats for easy insertion into a report, and all data is accessible via API as well.
Additional Resources
Wrapping Up & Next Steps
If you haven't read it, see how you can completely manage incidents from Slack without ever leaving the tool.
These guides only cover the basics of conducting incidents on FireHydrant. For more guides, see the docs sections on the left:
- Incidents section has in-depth guides for every piece of incident management and platform configuration
- Runbooks section contains details about Runbooks and how to automate and tailor your processes
- Analytics covers our Analytics capabilities in-depth
- Catalog contains documentation on our Service Catalog and how to set up and use it for more effective incident management
- Status Pages discusses FireHydrant's proprietary status pages. You can also integration FireHydrant with Atlassian Statuspage
- Integrations section covers all of the available integrations FireHydrant has
- Administration covers general account, user, and team configurations
- Reference contains quick-reference documentation that users may find themselves visiting time to time again.
If you have any questions or concerns, reach out to the Support team or your FireHydrant Account team if you're working with one.
Updated 4 months ago