Incident Custom Fields
Custom fields allow your organization to expand capabilities beyond what FireHydrant offers out-of-box. For example, there may be unique parameters or data you'd like to collect and analyze later.
Note:
Modifying custom fields settings requires Owner permissions within your organization.
Creating custom fields
In the FireHydrant UI navigation, select Settings and then Incident settings. On the top right, click "+ Add custom field".
In the custom field modal, you’ll have the following fields:
- Display name (required): The name as it will appear on forms and in the UI. The display name must be unique across the currently configured custom fields. The display name will be slugified automatically so you can reference it in Template Variables.
- Help text: A helpful description for completing the field that appears in tooltips in the web and Slack for your responders
- Type (required): the type of value for the field which can be one of the
following:String,Single-select,Multi-select. Single- and multi-select fields require at least one option, and you are able to change the order in which the options are displayed. - Field Settings: Specifies whether the field is required and/or should be immediately visible on the declaration form for users. See the next section for details.
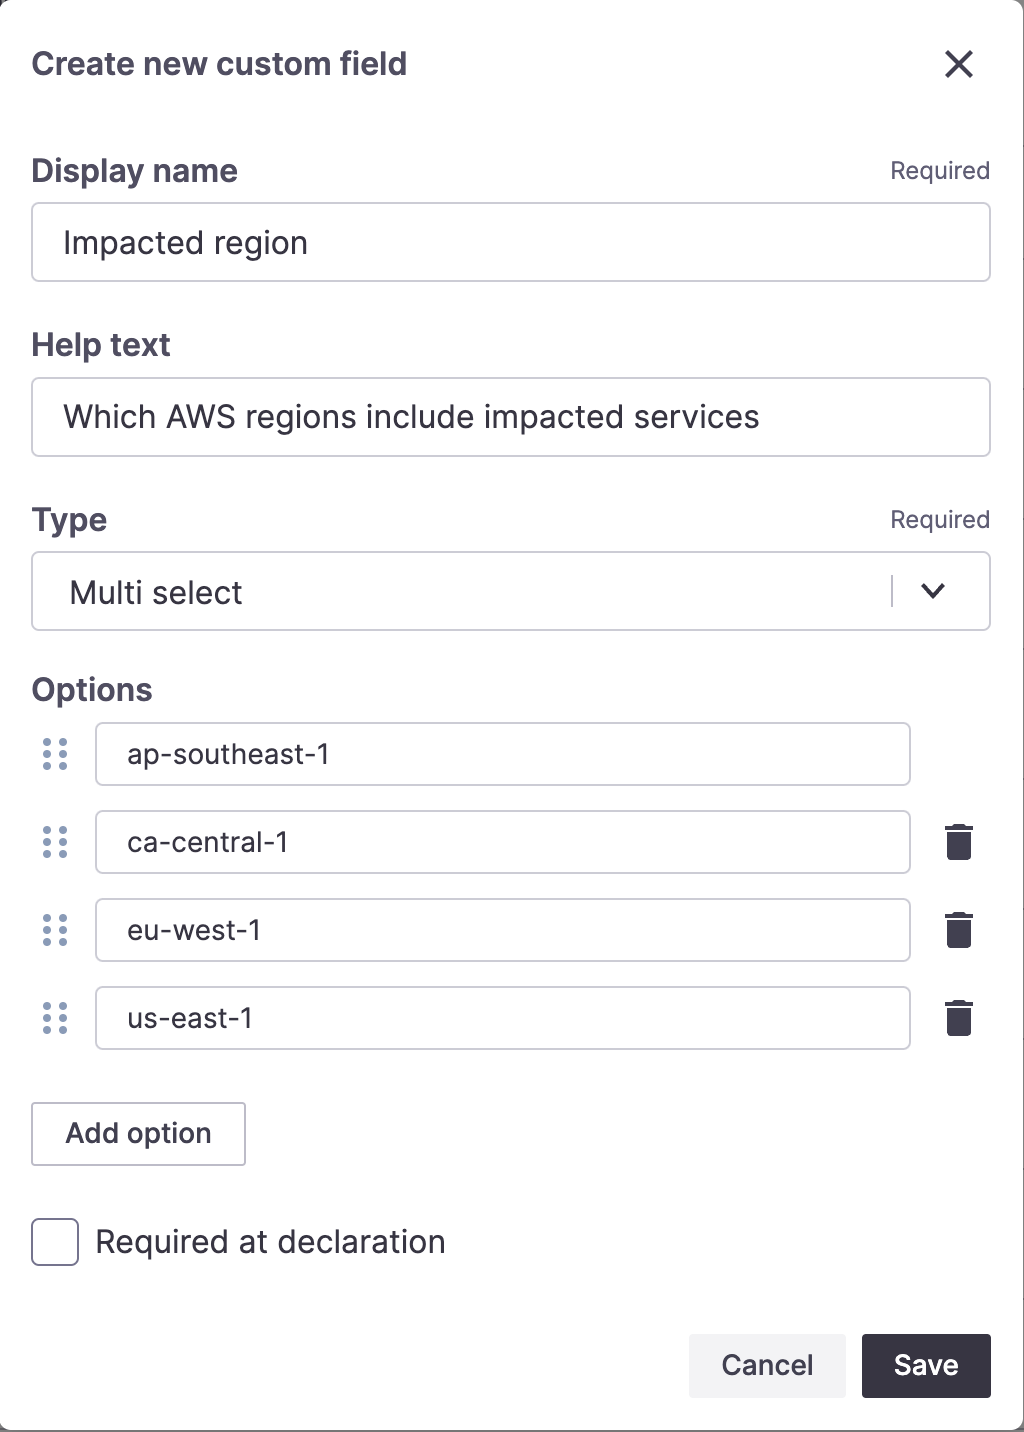
Example of creating a multi-select custom field
All incidents declared after creating a custom field will have the field available to fill in Slack and web UI. In addition, if you use an integration like Zendesk to declare incidents, custom fields will also be present in the external forms when trying to declare.
Note:
Accounts are currently limited to 10 custom fields.
Editing custom fields
In the FireHydrant UI navigation, select Settings and then Incident settings. In the table of incident fields, find the custom field you wish to edit and click the Edit icon.
You will be able to modify the display name, help text, and requirement settings for all fields, for single- and multi-select fields you will also be able to modify the options available in those fields. You cannot convert the field to a different type (e.g., string to single-select) - you will need to create a new field.
Note:
When an incident is declared, any fields on it like custom fields adopt whatever settings were configured at the moment of declaration. So for example, if you create an incident, then modify a custom multi-select field to add more options or change its name, those changes will not reflect on the incident you created since it was declared prior to your field changes.
At this time, we do not support propagating new field changes to old incidents.
Removing custom fields

Removing a custom field
In the FireHydrant UI navigation, select Settings and then Incident settings. In the table of incident fields, find the custom field you wish to edit and select the Delete icon.
Removing a custom field from your configuration will only impact future incidents. Any existing incidents with the custom field will continue to have that field available to edit and be used in searches.
Note:
Field removals cannot be undone. You will need to create a new field to "re-add" a deleted custom field.
Using Custom Fields
Once you've created custom fields, they will be made available on any Incidents declared after the field settings were saved.
Editing the value of a custom field
After an incident has been declared, you can edit the value of a custom field in the web UI and Slack. Custom fields preserve their options once an incident is created, so when you edit a field on the incident only options valid at the time it was declared will be available.
To edit a custom field from the web:
- Go to the incident
- Locate the custom field you wish to edit in the right sidebar
- Select the edit icon to open the edit modal
To edit a custom field in Slack you can use /fh edit:
It will be available to modify on the screen or in the "Additional Details" dropdown depending on your visibility settings.
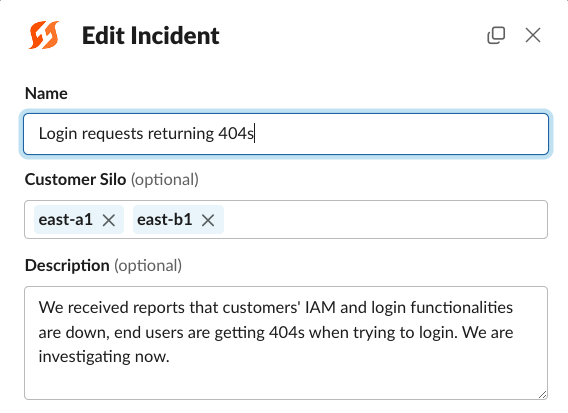
Custom field showing on the /fh edit modal
Searching custom fields
You can filter your search for incidents in the FireHydrant UI using data in your custom fields. Because custom fields can change over time, you’ll see both the active and inactive fields (previous fields that were deleted) and all the select options that were used in those fields. This allows you to remove custom fields from your current settings but still find historical incidents using previous data.
- Navigate to Incidents in the navigation:
- Select Add filter button
- Select the field you want to search on
- For string fields, enter the string you wish to search for
- For single- and multi-select fields, select the options you want to search on
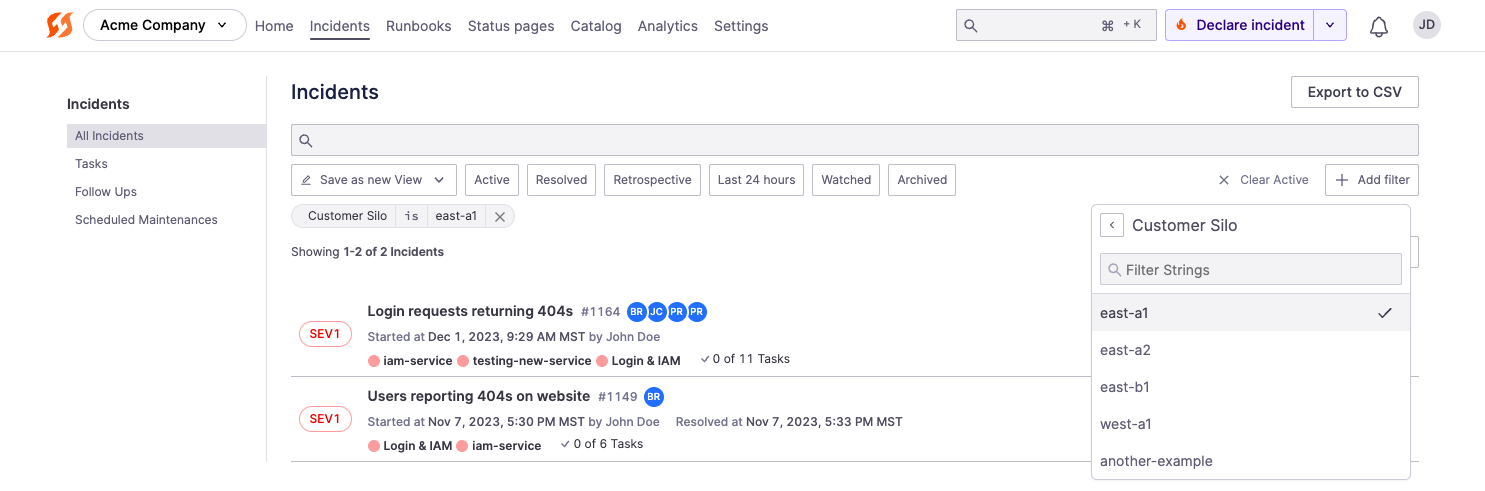
Example of filtering incidents by a specific value on a multi-select field
Using custom fields in Liquid templates
Incident fields, including custom fields, can be referenced anywhere Template Variables are supported. You can reference the value of a custom field directly like the example below. If you reference a slug that does not exist, you will receive a string value of <unknown value>.
All of your custom fields will be underscore-slugified versions of the name (for example, Customer Silo becomes customer_silo. Once you've configured the custom field settings, they should be available in the data model for Liquid autocomplete:

Auto-completing custom field slugs in Liquid
To access the value of a custom field, use *.value. For example:
{{ incident.custom_fields.<your_slug_here>.value }}
You can also use Liquid’s powerful control flow and iteration tags to output exactly what you need. For example, to iterate through all of your custom fields, you can use:
{% for field in incident.custom_fields %}
  {{ field.display_name }}
  {{ field.value }}
{% endfor %}
For more information, visit the Template Variables documentation.
Next Steps
- Learn about other ways to use your incident and custom fields, such as with Incident Types
- Customize your Incident Roles, Severities and Priorities, and more!
Updated 3 months ago