SSO with SAML
If you have an identity provider (IDP) that supports SAML 2.0, you can use it with FireHydrant as a single sign-on provider.
Prerequisites
- You'll need to reach out to our support team to enable SSO for your organization
- You will need Owner permissions to configure SSO settings on FireHydrant
- You will need administrative access to your IDP to create a new SAML application and administer users
Entra ID (Azure AD)
Setting up single-sign on with Entra ID enables employees in your Entra tenant to authenticate to and access FireHydrant accounts.
-
From the Entra Portal, click into Applications > Enterprise Applications
-
Click New Application > Create your own application
-
Name your app "FireHydrant" and select "Integrate any other application you don't find in the gallery (Non-gallery). Click Create.
-
Click into Single Sign-on once your app has been created and select SAML
-
Click Edit for "Basic SAML Configuration" and configure it as follows, then Save.
- Identifier (Entity ID): firehydrant
- (Optional) If you want to enable service provider-initiated (SP) sign-in, add this as a second identifier without switching it to the default: https://app.firehydrant.io/sso/saml/consume
- Reply URL (Assertion Consumer Service URL): https://app.firehydrant.io/sso/saml/consume
- (Optional) If you want to enable SP-initiated sign-in, set the Sign on URL: https://app.firehydrant.io/sessions/new
- Identifier (Entity ID): firehydrant
-
Click Edit for "Attributes & Claims" and configure it as follows, then Save:
-
Unique User Identifier (Name ID)
- Name identifier format: Email address
- Source: Set to attribute that stores the user's email address. This should match how you expect the user to appear in FireHydrant.
-
Additional Claims
Claim Name Namespace Recommended Mapping emailAddress http://schemas.xmlsoap.org/ws/2005/05/identity/claims Attribute that stores user's email address firstName http://schemas.xmlsoap.org/ws/2005/05/identity/claims user.givenname lastName http://schemas.xmlsoap.org/ws/2005/05/identity/claims user.surname
-
-
Under "SAML Certificates," download the Certificate (Base64). In order to open the certificate in a readable format that you can enter into FireHydrant, you will need to run to run the following:
openssl x509 -in certificatename.cer -outform PEM -out certificatename.pem
Open the resulting file in a text editor. -
In a separate browser tab, open FireHydrant's SSO settings page and check Enable SSO. Enter the following information from Entra ID:
Entra ID Value FireHydrant Field Login URL IdP Login URL Microsoft Entra Identifier IdP Issuer Use the output from step 6 IdP X509 Certificate - (Optional) Add a domain for SP-initiated logins. When users attempt to log in to FireHydrant directly with an email address that matches this domain, FireHydrant will display a note and redirect them to your IDP sign-in.
-
Click Save. You will now be able to test the login process from within Entra by assigning it to yourself and using the Test This Application button.
Google SSO
Setting up single sign-on with Google enables your G Suite account users to authenticate and access FireHydrant accounts.
- Follow Google's instructions on setting up a custom SAML application until you get to the Google Identity Provider details page.
- In a separate browser tab, open FireHydrant's SSO settings page and check Enable SSO. Three additional fields will appear: IDP Login URL, IDP Issuer, and IDP X509 Certificate. Copy the values from Google into FireHydrant as follows:
| Google Value | FireHydrant Field |
|---|---|
| SSO URL | IDP Login URL |
| Entity ID | IDP Issuer |
| Certificate | IDP X509 Certificate |
-
(Optional) In the Domains section of FireHydrant, you can add the email domain name for your organization.
- When users attempt to log in to FireHydrant directly with an email address that matches this domain, FireHydrant will display a note and redirect them to your IDP sign-in.
-
Click Save in FireHydrant.
-
In Google, click Next. Google prompts you to fill in Service Provider details. For the ACS URL and Entitiy ID fields, enter
https://app.firehydrant.io/sso/saml/consume. -
Enable the Signed Response checkbox.
-
Verify that Primary Email is selected for the Name ID section. This is how your SSO configuration automatically creates accounts or logs existing users into FireHydrant.
-
For the Name ID Format field, select Email. Click Next.
-
(Optional) On the last step of the Google setup, provide any attribute mappings you'd like to include when users are sent to FireHydrant. These are optional, but we recommend setting the first and last name attributes so when users are provisioned, their names are automatically set correctly in FireHydrant.
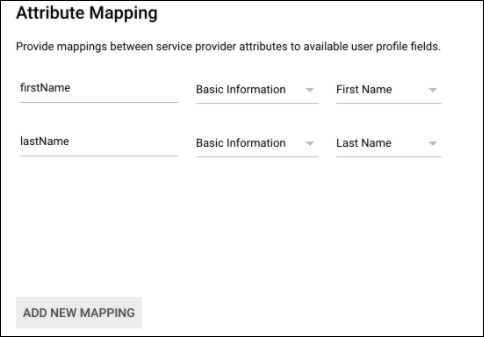
Attribute mapping in Google
-
Click Finish. This completes your Google SSO setup.
Okta SSO
Note:
When a user is authenticated with Okta, they are automatically added to the organization with a Member role if they do not have an account.
Otherwise, accounts are matched on the email provided by Okta on a successful login. When a user is removed from Okta, they are not automatically removed from FireHydrant.
Our Okta SAML integration is one-way - FireHydrant accounts will be automatically provisioned but not automatically de-provisioned. Users whose accounts are auto-provisioned with Okta are set to the Member role.
- As an Okta admin, view all applications in the Applications tab. Then:
- Click Browse App Catalog
- Search for the FireHydrant app, click it, and then click Add Integration
- Name your app and click Next. This will drop you onto the Assignments page.
- Click into Sign On and go to View SAML setup instructions.
- In a separate browser tab, open FireHydrant's SSO settings page and check Enable SSO. Enter the IDP Login URL, IDP Issuer, and IDP X509 Certificate details from Step #4 into FireHydrant.
- (Optional) Add a domain for SP-initiated logins. When users attempt to log in to FireHydrant directly with an email address that matches this domain, FireHydrant will display a note and redirect them to your IDP sign-in.
- Enable SSO and save your configuration. This completes the setup for Okta SAML 2.0.
Generic
- For other identity providers aside from Google and Okta, you can set up the integration by entering FireHydrant's SAML details as below when creating a new SAML application:
- Consumer URL:
https://app.firehydrant.io/sso/saml/consume - Recipient URL and Audience URL: Same as the consumer URL
- Audience:
firehydrant - Attribute statements: First Name as
firstName, Last Name aslastName
- Consumer URL:
- After you've created your SAML application, you will then need to configure settings within FireHydrant:
- In FireHydrant, navigate to Settings > Single Sign On.
- On the Single Sign On page, check the box labeled Enable SSO.
- Additional fields appear. In these fields, provide your IDP login URL, IDP issuer, and IDP X509 certificate as generated by your identity provider.
- (Optional) If you'd like, you can add Domains. When users attempt to log in to FireHydrant directly with an email address that matches this domain, FireHydrant will display a note and redirect them to your IDP sign-in.
Testing
To test, leave your session in FireHydrant open. Visit your IDP in a new window or tab and attempt to log in with your newly configured integration.
Leaving your FireHydrant session open should prevent you from getting locked out of your account during setup. If you encounter a lockout, submit a ticket on our contact form for help.
Updated about 1 month ago